The use of proper headings is one of the most important formatting cues for a screen reader user. Proper heading structure enables learners to understand the structural hierarchy of the document.
Recognize the difference between semantic and formatted headings. A formatted heading involves text that is a larger size than the body text, but that was not created using tags (e.g. the Heading feature in Microsoft Word). While visual learners can scan the page for larger text, users who rely on a screen reader are not able to see these elements, so using semantically “tagged” headings is critical. An example of a semantically tagged heading is one created with the heading feature in Word or by selecting a heading from the format tool in a learning management system.
What is proper heading structure? In most word processing applications (Word, Open Office, Google Docs, etc.) the top-level heading is called Heading 1. Think of Heading 1 as a page title. There should be only one top-level heading on each page. A subheading of Heading 1 is Heading 2 and a subheading of Heading 2 is Heading 3, etc., down to Heading 6. The language used in Blackboard is a little different, but the concept is the same.
Add headings in the Blackboard Content Editor:
- In the content editor, highlight the desired text.
- Select the proper heading level from the formatting selector (e.g. Heading for a top-level heading; Sub Heading 1 for a subheading of the top-level heading, etc.).
Here is an example of the heading structure in the Blackboard content editor:
Dog Breeds (Heading)
- Big Dogs (Sub Heading 1)
- Great Dane (Sub Heading 2)
- Great Pyrenees (Sub Heading 2)
- Small Dogs (Sub Heading 1)
- Boston Terrier (Sub Heading 2)
- Pug (Sub Heading 2)
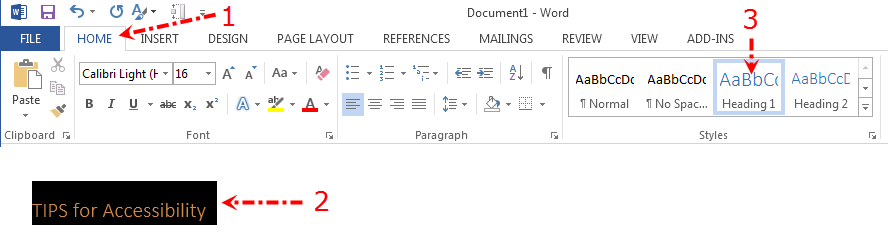
Add headings in MS Word:
- Select the Home tab.
- Highlight the text to be linked.
- Select the appropriate heading selector in the styles panel (e.g. Heading 1 for top-level heading).
Here is an example of the heading structure in MS Word:
Dog Breeds (Heading 1)
- Big Dogs (Heading 2)
- Great Dane (Heading 3)
- Great Pyrenees (Heading 3)
- Small Dogs (Heading 2)
Below is a graphic illustrating the top-level heading and two levels of subheadings in Microsoft Word and in the Blackboard content editor.
Note: For those of you who are interested in the underlying HTML code, since Blackboard consists of several parts on each page, the top-level heading in the content editor is actually a Heading 4 tag <h4>, with the two levels of subheadings being Heading 5 <h5> and Heading 6 <h6>.
Always use the proper level of heading. If you do not, learners who use screen readers will become confused and unable to easily browse the document. Do not select a heading because you like how it looks; Word and other word-processing applications allow you to customize styles to achieve the visual effect you would like without compromising proper header nesting:
- See Accessibility Cheatsheets from The National Center on Disability and Access to Education