This quick introduction will explain recording settings, common uses for different recording settings, and presentation tools during screen capturing recordings.
Kaltura Capture Recording Interface
 There are three main buttons that you can toggle on or off when recording.
By default, they are Screen (2), Camera (2), and Audio (3).
Clicking on their respective icon will enable or disable the source.
Clicking the name or chevron below the icon (4 or 5) will give you options to change the source and any applicable settings for that source.
A preview box (7) will show the visual inputs before recording.
Click the Record button (1) to start the recording. Initiating a recording will start a three second countdown. When finished, you can save the recording, and choose to upload it to Kaltura My Media, or save it to your local device for later uploading.
There is a Manage link (6) on the interface that will take you to your local device’s Kaltura video library. Here it will identify media that has been uploaded to My Media, and if so, what url they uniquely have. You cannot place your recordings in Blackboard or your site until it is uploaded to My Media.
Recording Types
- Screen, Camera, and Audio is used when recording a presentation or lecture.
- Screen and Audio recording option is commonly used when a user has a PowerPoint and wants a voice over recording for their presentation. Users can open their PowerPoint and then choose whether Kaltura should record the whole screen or a part. Selecting a part of the screen is especially useful if you have notes on your computer that you would like to use while presenting.
- Camera and Audio recordings are great for a lecture or a brief introductory recording for the “About the Instructor” section or posts on discussion boards.
- Audio recordings are useful for blogging or for foreign language pronunciation assignments.
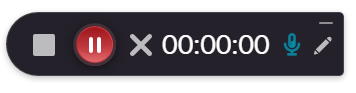
Recording Menu
When recording, the interface will show the recording menu. You can stop, pause, cancel, and keep track of your recording time. During screen recordings, the screen recording tools menu will be available when clicking the pencil icon.
Screen Recording Tools
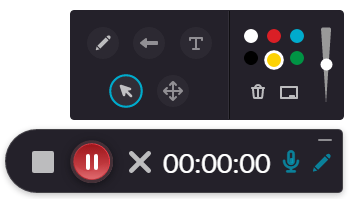
During a screen recording, especially during a presentation or a lecture, the tools menu is very convenient for clarification on the screen. From the top right, there is a drawing tool, arrow tool, text tool, cursor highlighting tool, and select tool. On the right of the tool menu, there are options for the tools: color, size, and clearing the items added to the screen. If the background interferes with the text, there is also a whiteboard tool (bottom right), that will bring up a white window on which you can write or draw.
When you stop recording, the video file will appear in the Kaltura Library.

From here you can change the title and description, add any tags to the video, and either Save & Upload or Save the recording. With this version of Kaltura desktop recording, you do not need to be connected to the internet to record. Saving and Uploading will upload the media to Kaltura’s My Media, and it will be accessible on both Blackboard and video.uark.edu. If you need to edit your video, you can edit it after uploading it to My Media. Saving alone will save the file to your local device, and you can upload it to My Media later if desired from the Manage button on Kaltura Capture.
Next: Uploading Your Media to Blackboard
For more information about Kaltura, please visit About Kaltura.